Resistors have many uses in our everyday lives. A vehicle has many types of resistors . Of course, automotive air conditioning is crucial. Blower motor resistors are a vital part of the whole system. Fundamental information on resistors for blower motors is explained here.
Catalog
Definition: Blower Motor Resistor
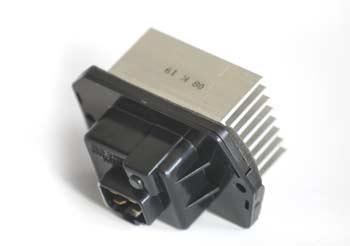
Figure 1. Blower Motor Resistor Module
Your car's heating, ventilation, and air-conditioning system are made up of a number of components that cooperate to achieve the desired interior air temperature. With any luck, some of these components should outlast a car's life, but others will eventually get worn out and need replacement.
The blower motor resistor is a minor electrical component that, if it fails, may create visible difficulties with the air there in the passenger compartment. If you understand how it operates, it will be much easier to recognize the signs that a resistor has failed.
What does a Blower Motor Resistor Do?
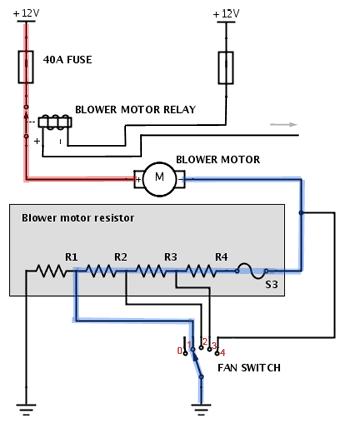
Figure 2. Blower Motor Resistor Function
The speed of the blower fan in a vehicle may be adjusted by adjusting the resistance of the blower motor , which is connected to the fan switch. Mechanically, using a spinning lever or electrically, the air conditioner may adjust the fan speed by altering the blower resistor resistance.
The blower motor resistor is what determines how fast the fan spins. This used to be achieved by adjusting the power provided to the fan motor. Today, most applications use a solid-state module instead of a traditional resistor to control the blower motor's speed.
The conventional resistor for a blower motor is attached in series with the engine and grounded. The blower motor resistor may be found in a variety of strengths. The current via the fan motor is regulated by this. One or more of the blower resistor assembly's resistors are linked to each fan speed setting.
The resistance to current flow is varied to regulate the maximum rotational speed of the blower motor. When maximum acceleration is required, the blower motor resistor ground circuit is temporarily disconnected, and the blower motor's ground terminal is connected to the ground. The most significant amount of power may then be sent to the fan motor.
Blower Motor Resistor Location
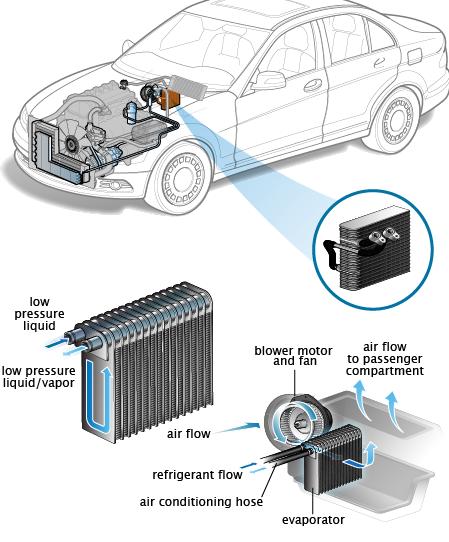
Figure 3. Blower Motor Resistor Location
It is located underneath the blower motor. It may be necessary to remove the glove box from certain vehicles in order to get to the blower motor resistor.
Symptoms of Bad Blower Motor Resistor
It is possible for the functioning of the whole air conditioning system to be thrown off if the blower motor resistor is incorrect. In most cases, a faulty blower motor resistor can result in a few indications that will serve to draw the attention of the driver to the possibility of a problem.
It is essential to have a solid understanding of the signs that indicate a broken motor resistor.
1. The Motor for the Blower is only Capable of Operating at One Speed
A defective blower motor resistor often presents itself with the symptom of a blower motor that is permanently set to one of its settings. The resistor in the blower motor is the crucial component in regulating the rotational velocity of the fan. The blower motor may get stuck at a single fan speed if somehow the resistor shorts out or dies.
The air conditioning and heating systems may keep operating at the same pace, but the resistor must be changed before the systems can be returned to their full capability.
2. The Blower Motor Resistor does not Turn on
Another typical sign of a broken blower motor resistor is that the motor will not perform in certain conditions. If the components of the resistors in the blower motor fail, the blower motor resistor can malfunction or cease to work entirely on one or more of the available settings.
If you are still determining what the issue is, you should have it properly diagnosed as soon as possible since it is possible that a defective blower motor switch was the cause of the predicament.
3. The Vents in the Car are not Producing any Air Flow at all
The lack of air from the car's vents is another indication that the blower motor resistor is broken. The blower motor resistor is connected to the power supply, and so, if the resistor fails or develops any other issues, it is possible to turn off the power supply to the blower motor.
Suppose the power to the blower motor fails. In that case, the blower motor will be unable to generate any air pressure, resulting in the air-conditioning and heating system being unable to expel any air from the vents. Failure of the blower motor resistor, which provides power to the motor, may create serious issues with the motor and the HVAC system.
If your vehicle displays any of the symptoms described above, or if you have any reason to believe that the blower motor resistor is not performing properly, you should have it examined by a trained specialist who can decide whether or not the component must be replaced.
How to Test a Blower Motor Resistor
1. Find the Blower Motor Resistors Fuse
In order to fix your car's blower motor resistor fuse , you must first find its location.
2. Be Sure to Check the Resistor Fuse
Locating the resistor fuse for the blower motor is the first step in ensuring it is functioning correctly. Use a 12 V test light with one end connected to the ground while the other end is connected to the fuse terminal.
Observe the current flow between the terminals to ensure the fuse is functioning correctly. To know whether the fuse is functioning properly, check to see if electricity is flowing to both terminals. However, the fuses will burn out and need to be replaced if they lose power.
3. Remove the Blower Motor Resistor and Test it
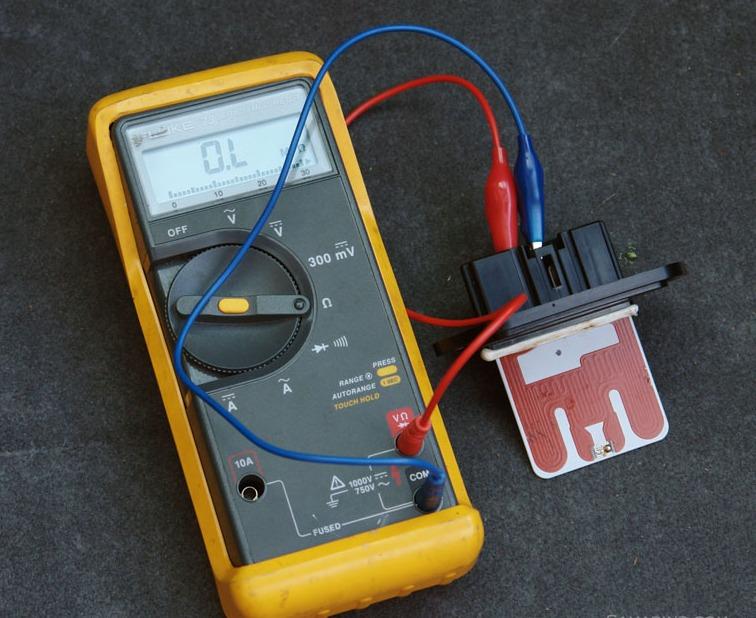
Figure 4. Testing Blower Motor Resistor
As before, disconnect the blower motor's power source and attach it to the 12 V test light. Doing the Test in this fashion will eliminate any potential error caused by your car's electronic temperature control system.
Altering the blower motor's speed during the activity can help you pinpoint whether or not the issue is occurring at a specific rate of airflow. A faulty blower motor will be noticeable since it will lose power while operating at higher speeds.
Remember that the blower motor gets power from the switch at specific high speeds, so if you set the motor to faster speeds and notice no power, the issue might be connected to a defective switch. If the blower motor is functional at high speeds but not at lower ones, the issue is likely associated with the blower motor resistor.
4. Check the Blower Motor's Grounding
The vehicle's body is the ground for the blower motor; if the ground is damaged, the motor will not work. Worn-out rounds might cause your blower motor to malfunction in spurts. The ground of the blower motor should be checked if none of the other listed tests reveal a problem with the resistor.
How to Replace a Blower Motor Resistor
Here are the basic procedures for changing a resistor in a blower motor:
1. The Blower Motor Resistor Must Be Located
The first step is to find the resistor for the blower motor so you know what has to be removed. It sits in close proximity to the fan's motor. In contrast, the latter is often located in the engine bay or under the dashboard on the passenger side.
2. Pull the Blower Motor Resistor
Now that you've located it, take off the resistor from the blower motor. Start by taking apart the housing for the blower motor resistor, which includes the pigtail leading to the air conditioner and the cooling duct. The resistor for the blower motor may be accessed without difficulty. The last step is to remove the blower motor resistor's fasteners.
The screw has to be tightened with a ratchet with a small extension. Pulling the blower motor resistor out will be the last step once the bolts have been removed.
3. Disconnect Wires
After the resistor for the fan blower has been disconnected, the fan may be turned back on. To sever the wires, use wire-cutting shears or a stripper.
4. Set up the New Blower Resistor
Before installing the resistor for the blower motor, be sure to lubricate its housing with dielectric grease. When going off-road, water may quickly become a problem, but this solution will prevent that. It is recommended to apply a coat all around plastic to form a cover that will safeguard the part.
If you have removed the resistor from the blower motor, you should put it back in its original spot. Put in new screws to make sure they stay put. After you have completed the task, connect the pigtail. Unfortunately, the pigtail may be beyond repair in certain instances. If that's the case, go on to the next section.
We need to have the old cables cut and the new ones reconnected. This should be easy to figure out given that the cables are presumably color-coded. Join the new cables together using the plugs. All that's required is to put the pigtail back where it came from.
Conclusion
A blower motor resistor may be a little component of the HVAC system, but it plays a crucial function nevertheless. Because it determines how fast the blower motor fan spins, the blower motor resistor is the most vulnerable part of the device.
When the resistor in the blower motor fails, you should replace it immediately. If not, you may find yourself without functional heating and cooling. You should repair the blower motor resistor promptly when it gets that. However, if your car has other, more severe issues with the engine or transmission, it may not be worth the money to attempt to repair the blower motor resistor.